BackForwardTable of Contents


Basic Setup

Summary of Basic AP Setup Status

Item
Description
IP Address
Show the IP address of an AP. Since the IP address is allocated from DHCP or as a fixed value from 'Ethernet Setup' as described in Guest Interface Ethernet (Wired) Setup, this item cannot be modified.
MAC Address
Shows the MAC address of an AP.
MAC address is a permanent and unique Hardware address of a device indicating Network interface. The MAC address is assigned by a manufacturer and users cannot change the MAC addresses. In this item, the address is supported for the purpose to provide the information as a unique identifier of interface and indicates the MAC address of a bridge.
This address is an address to be known to other Networks.
To check Guest or Internal interface of AP, refer to Status > Interface.
Firmware Version
Show the version information of a firmware currently installed in AP.
Whenever the new version of SMT-R2000 firmware is released, the firmware is upgraded to enable to use AP with the strengthened function.
For the method to upgrade of a firmware, refer to Firmware Upgrade.
Country Code
Chooses AP-using country. When you change the country code, beware of channel setup.
Note: When you change the country code, you must reboot after completing the update.
Compensation of Base Period
Compensates Coordinated Universal Time (UTC) received via NTP. For example, since Seoul has the time difference of 9 hours from the UTC, 9(SL) is selected.
Location
Describes the location of AP.

Network Setup

Items
Description
Current Password
Enter the current administrator' password. Before you change the password, you must enter the current password exactly.
If the password is correct, the check mark is displayed and the following items can be changed.
New Password
Enter a new administrator password. The letters you entered are displayed as "*" not to show to others.
The administrator's password should be alphabetical string with 8-letter at maximum length.
As the first step for Radio LAN security, it is recommended to change the administrator password.
Confirmation of New Password
Re-enter the administrator password to confirm the new administrator password.
802.11a, 802.11b/g (SSID)
Enter the name of radio Network as a string. This name will be applied to all APs over the network. Whenever APs are added, the APs will share this SSID.
Service Set Identifier (SSID)is an alphabetical and numerical string with 32 letters at maximum length.
Note: If you re-set SSID while you access and set AP via a radio client, the access to AP may be disconnected. In this case, you should re-access with new SSID after storing the changes.

Note

SMT-R2000 does not allow the change of multiple setups at the same time. If you establish a network with multiple APs or several administrators access Administrator's Web page and change the setups, all APs in the group will enter to the standby mode until the synchronization is completed. However, this action does not ensure the complete application of the setups changed by various users.

Update of Basic Setup

If new setup is completed, click the Update button to apply the changes.

Summary of Basic Setup Status

When the basic setup is updated, the summary of changes can be displayed along with the information of the next step.

The security for AP is not set in the initial operation. The security setup is, also, the important step. Refer to Security.

Re-click of the basic setup changes the summary of the Setup page into the standard basic setup page.

Change of Web page Language and Setup

The design panel on the top of all AP setup screen enables you to customize the exteriors of all Web pages. You can change font sizes and select one of various languages
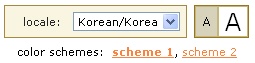
Locale

You can choose one of the following two languages:

The choice of the language you want converts texts on all pages in English or Korean.

Font Size

Click one of font size buttons on the design panel to change text sizes on the screen.

configuration
Description
Normal
Large

Color Schemes

To customize the colors on the screen, select one of the following three options:

configuration
Description
Scheme 1
Changes the colors into Grey and Blue.
Scheme 2
Changes the colors into Grey and White.

BackForwardTable of Contents


Copyright © Samsung Electronics Co. Ltd.   All Rights Reserved.    About this Help

Glossary